This article will outline how to setup a Custom Webcheck by explaining what JSON object formats are required and what each section within the JSON object will specifically do.
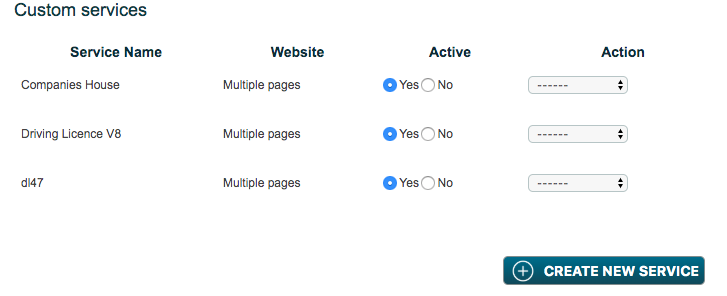
The first step is to click 'Create New Service' which can be found at the bottom of the Webcheck application in the store.
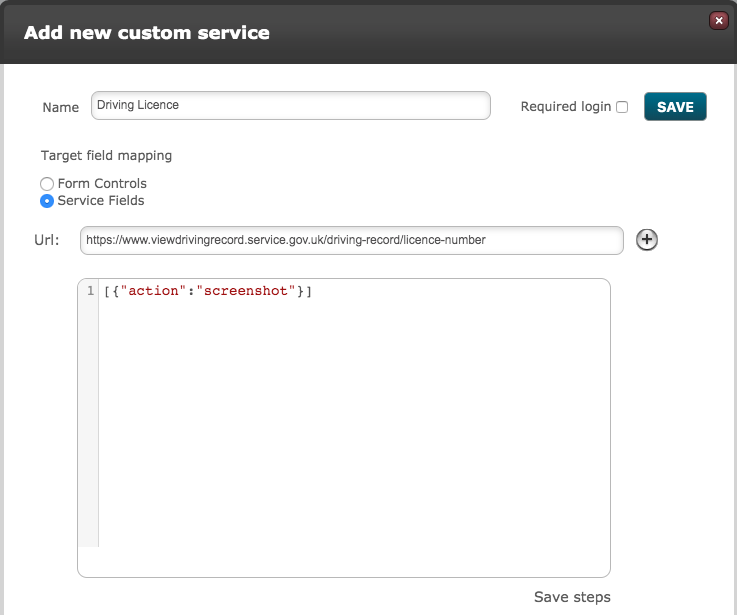
Next you will be asked to name your Custom Webcheck, select the format of the Target Field Mapping and also the URL for where you want the data from. Click here for more information.
When you click Service Fields and provide a URL, you will see a button appear called 'Configure Steps' - click on this. Once done, you will see a configurable JSON object will appear with some default code visible (visible format of this code will change its layout after 'Save steps' is clicked).
Note: The URL added needs to be the page where the process to obtain the desired information begins.
The JSON object that is configured is sent to a service called Cotterpin. Cotterpin expects specific formats/commands in order to complete the request that is made in the Custom Webcheck.
When writing the JSON object, the entire object needs to be surrounded by square brackets [ ].
Then for each step required curly brackets { } need to be used. When multiple steps are being used, the steps need to be comma separated.
There are 6 different properties that can be used: action, selector, value, return_as, date_format and selector_date_format.
Action
For action, the user will specify what they want the service to action. The following actions can be used:
- "click" - Use this action when you want the service to click somewhere on the screen. This would be used when clicking buttons or checkboxes etc.
- "click_all" - Use this action when you want the service to click on all of something on the screen. This would be used when there are multiple/duplicate buttons that instead of specifying each button, can all be clicked as one action.
- "set_field_value" - Use this when you want the service to input a field/data somewhere on the screen. This would be used when there are fields such National Insurance Number, Vehicle Registration Number etc that require a value to progress to the next page.
- "set_date_value" - Use this when you want the service to input a field/data that is a date somewhere on the screen. This would be used when the website being used is requesting a date and requires the value to be in date format too.
- "get_value" - Use this action when you want to get a value/data from a page.
- "get_date" - Use this action when you want to get a date from a page.
- "screenshot" - Use this action when you want the service to take a screenshot of the screen it is currently on.
Below is an example of the JSON format of how it will look
{
     "action": "set_field_value"
}
Selector
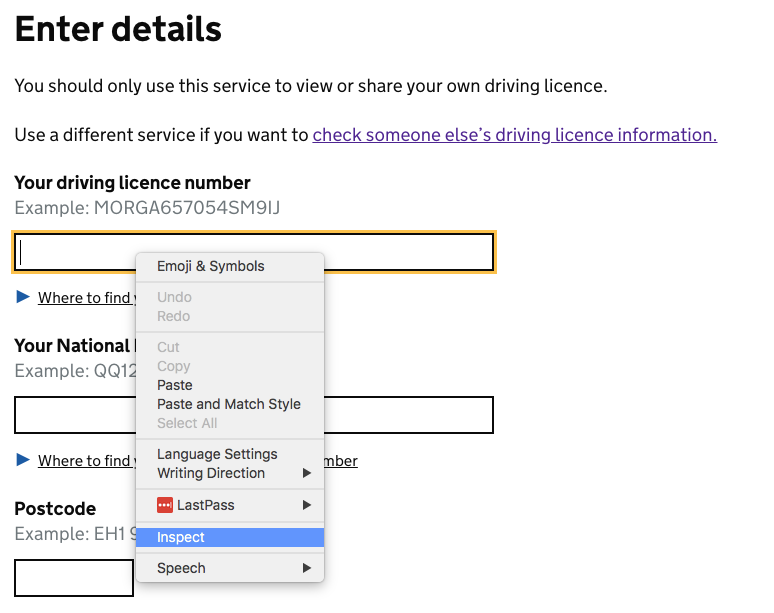
For selector, the user will specify what field/element on the page will have the action performed against. The user will need to identify the button, field, tab etc by inspecting the element(s) on the page - this can be done by right clicking on the element on the website then click in Inspect.
The user will then be able to identify the element by the id or another form of identification.

On the line of code which refers to the field/button etc that is to be used, the user can then right click on this too and go to copy -> Copy selector.
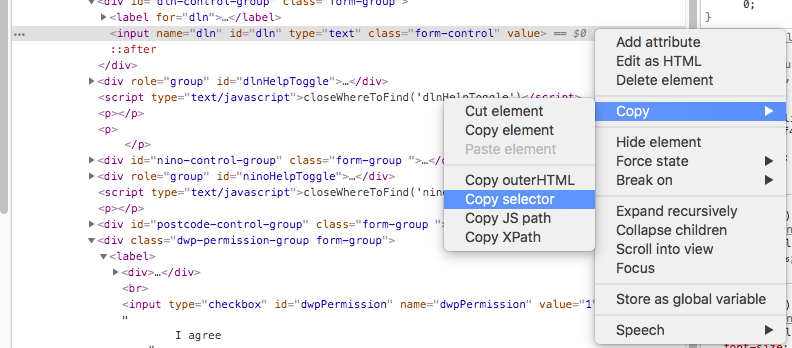
With this element identified, it can be used in the selector property - an example of this is shown below.
{
     "action": "set_field_value",
     "selector": "#dln"
}
Value
For Value, the user will specify what merge field/value they want to be added on to the selected element on the page.
Below is an example of the JSON format of how it will look
{
     "action": "set_field_value",
     "selector": "#dln",
     "value": "<<target.field_driving_licence_number>>"
}
In the above example, the merge field for Driving Licence Number will be inputted on to the website.
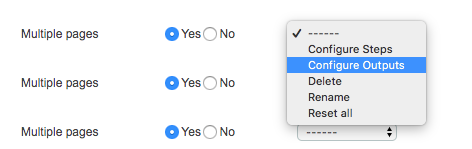
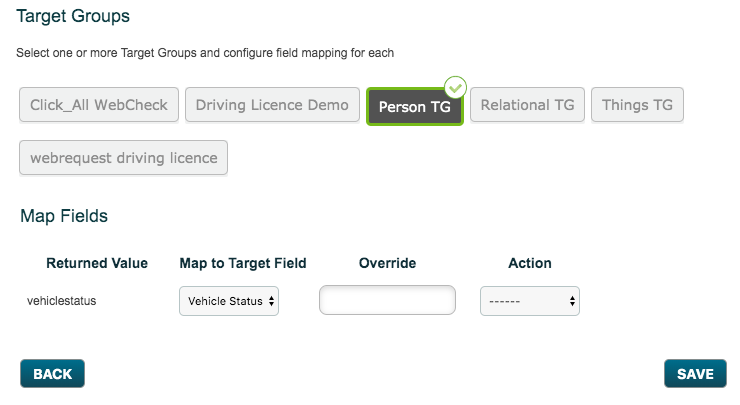
Return_as
For Return_as, the user will specify the value which the cotterpin service response will send to autologyx. This value will then be mapped to a target field in autologyx. This can be done by clicking on the action drop-down menu and clicking on 'Configure Outputs'.
Below is an example of the JSON format of how it will look
 {
 "action": "get_value",
 "selector": "li:nth-child(9) > span:nth-child(2) > strong",
 "return_as": "vehiclestatus"
 },
Date_format
For date_format, the user will specify the formatting of the date string, relating to the value that will be set on the given URL in the given selector.
Below is an example of the JSON format of how it will look
{
    "action": "set_date_value",
    "selector": "input#expiration_date",
    "value": "3/7/2019",
    "date_format": "DD-MM-YYYY"
 }
Selector_date_format
For selector_date_format, the user will specify the date formatting string expected to be set on the page for the given selector.
Below is an example of the JSON format of how it will look
{
    "action": "set_date_value",
    "selector": "input#expiration_date",
    "value": "3/7/2019",
    "date_format": "DD-MM-YYYY",
    "selector_date_format": "DD-MMM-YYYY"
 }
Errors from Steps configuration
| Message | Reason |
| ‘action’ is a required property | No action property |
| ‘(not_supported_property)` does not match ‘(screenshot|get_value|set_field_value|fill_form|click) | Not supported property |
| ‘(property_x)’ is a required property for `action_y` | Missing property for specified action |
| ‘[]’ is to short | No steps defined |
| ‘(not_valid_url)’ does not match '^(https|http)://' | Not valid URL |
| Not a proper json format | Wrong Json |
Comments
0 comments
Please sign in to leave a comment.