This article will outline how to setup a HCPC Webcheck by explaining what JSON object is required and what each section within the JSON object will specifically do.
The first steps are to name the custom webcheck and provide the URL.
The URL to be provided, is the following https://www.hcpc-uk.org/ - this URL is the page where a user of the page is required to input their HCPC Registration Number and the Profession.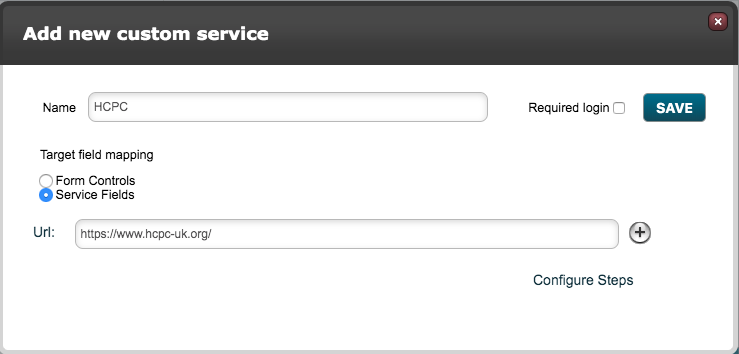
Next the user needs to click on 'Configure steps' for the URL that has been provided. Paste the following JSON object below into the Steps configuration.
[
       {
       "action": "set_field_value",
       "selector": "#Query",
       "value": "<<target.field_hcpc_number>>"
       },
       {
       "action": "set_field_value",
       "selector": "#Profession",
       "value": "<<target.field_hcpc_profession>>"
       },
       {
       "action": "click",
       "selector": "#js-professional-search"
       },
       {
       "action": "screenshot"
       },
       {
       "action": "get_value",
       "selector": "#main > div.container-fluid.content-wrapper > div:nth-child(1) > div.col-xs-12.col-lg-8 > div > div > table > tbody > tr:nth-child(3) > td:nth-child(2)",
       "return_as": "location"
       },
       {
       "action": "get_value",
       "selector": "#main > div.container-fluid.content-wrapper > div:nth-child(1) > div.col-xs-12.col-lg-8 > div > div > table > tbody > tr:nth-child(4) > td:nth-child(2) > span",
       "return_as": "status"
       },
       {
       "action": "get_value",
       "selector": "#main > div.container-fluid.content-wrapper > div:nth-child(1) > div.col-xs-12.col-lg-8 > div > div > table > tbody > tr:nth-child(5) > td:nth-child(2)",
       "return_as": "hcpcdates"
       }
]
Step 1 breakdown
The first part of the JSON object as shown below, is required to input the values to then see if the candidate is registered along with the dates. The separate sections have been broken down to show what each section corresponds to on the HCPC website.
In the JSON object configuration, the merge fields highlighted in orange will need to be changed based on what the fields are called in the build that requires this HCPC Check.
In this step 1 breakdown, at the bottom the first screenshot action will return a screenshot of the 'Professional Registration Detail' page for the candidate.
      {
      "action": "set_field_value",
1     "selector": "#Query",
      "value": "<<target.field_hcpc_number>>"
      },
      {
      "action": "set_field_value",
2     "selector": "#Profession",
      "value": "<<target.field_hcpc_profession>>"
      },
      {
      "action": "click",
3     "selector": "#js-professional-search"
      },
      {
      "action": "screenshot"
      },
For step 1 the system will set the selector '#Query' (this is the field 'Surname or registration number') with a merge field value
For step 2 the system will set the selector '#Profession' (this is the field 'Choose a profession') with a merge field value
For step 3 the system will 'Click' on the selector '#js-professional-search' (This is the Pink/Purple Search button)

Step 2 breakdown
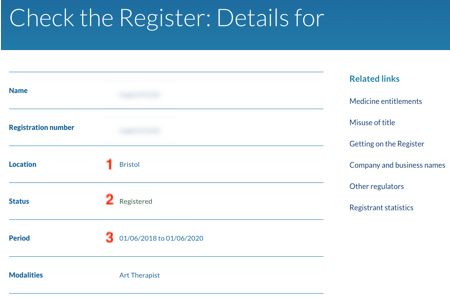
The second part of the JSON object refers to the system grabbing/getting data on the same 'Professional Registration Detail' page.
      {
      "action": "get_value",
1     "selector": "#main > div.container-fluid.content-wrapper > div:nth-child(1) > div.col-xs-12.col-lg-8 > div > div > table > tbody > tr:nth-child(3) > td:nth-child(2)",
      "return_as": "location"
      },
      {
      "action": "get_value",
2     "selector": "#main > div.container-fluid.content-wrapper > div:nth-child(1) > div.col-xs-12.col-lg-8 > div > div > table > tbody > tr:nth-child(4) > td:nth-child(2) > span",
      "return_as": "status"
      },
      {
      "action": "get_value",
3     "selector": "#main > div.container-fluid.content-wrapper > div:nth-child(1) > div.col-xs-12.col-lg-8 > div > div > table > tbody > tr:nth-child(5) > td:nth-child(2)",
      "return_as": "hcpcdates"
      }
For step 1 the system will 'Get' the selector '#main > div.container-fluid.content-wrapper > div:nth-child(1) > div.col-xs-12.col-lg-8 > div > div > table > tbody > tr:nth-child(3) > td:nth-child(2)'. This will get the 'Location' value.
For step 2 the system will 'Get' the selector '#main > div.container-fluid.content-wrapper > div:nth-child(1) > div.col-xs-12.col-lg-8 > div > div > table > tbody > tr:nth-child(4) > td:nth-child(2) > span'. This will get the 'Status' value.
For step 3 the system will 'Get' the selector '#main > div.container-fluid.content-wrapper > div:nth-child(1) > div.col-xs-12.col-lg-8 > div > div > table > tbody > tr:nth-child(5) > td:nth-child(2)'. This will get the 'Period' date values.
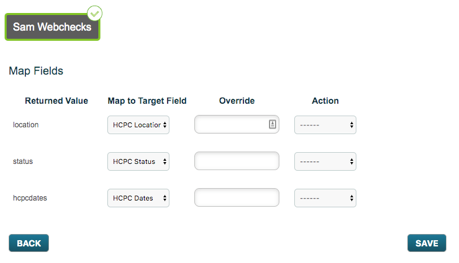
Step 2 mapping
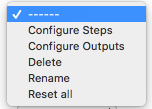
To be able to retrieve values/dates from a website as shown above in regards to Location, Status and Period, the user will need to map the target fields in the system with the values that are to be returned. This is done by selecting on the 'Action' drop-down menu on the Webcheck list, the option 'Configure Outputs'.
The user will then be presented with the below page where they will need to select the target group for the targets who will have the Webcheck run against. Once done, they will then be asked to map target fields with the 'Returned Value column'. The options in the Returned Value column are defined in the JSON code - see below in orange where we define this.
      {
      "action": "get_value",
      "selector": "#main > div.container-fluid.content-wrapper > div:nth-child(1) > div.col-xs-12.col-lg-8 > div > div > table > tbody > tr:nth-child(3) > td:nth-child(2)",
      "return_as": "location"
      },
      {
      "action": "get_value",
      "selector": "#main > div.container-fluid.content-wrapper > div:nth-child(1) > div.col-xs-12.col-lg-8 > div > div > table > tbody > tr:nth-child(4) > td:nth-child(2) > span",
      "return_as": "status"
      },
      {
      "action": "get_value",
      "selector": "#main > div.container-fluid.content-wrapper > div:nth-child(1) > div.col-xs-12.col-lg-8 > div > div > table > tbody > tr:nth-child(5) > td:nth-child(2)",
      "return_as": "hcpcdates"
      }
Comments
0 comments
Please sign in to leave a comment.