
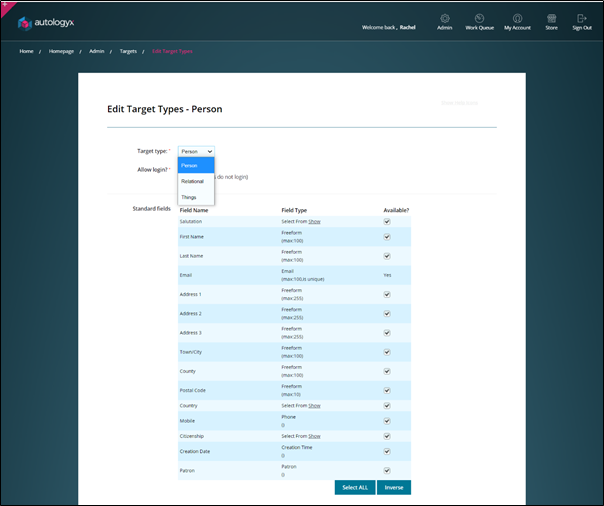
Target fields are created here: Admin/ Targets/ Edit Target Types
The Edit Target Types page provides an area for adding and amending data fields which are then applied to Target Groups.
When applied to a Target Group fields, can be used across the system in places such as Dynamic Forms, in Target Field Completion criteria, as merge fields in Message and Document Templates and in Truth Table and Sequence configurations.
At the top of this page you will find a select-from field with 3 options. These relate to the target types explained here – Person, Things and Relational.
We create target fields for a Target Type so that the same field can be used by several Target Groups of the same Type. For example, a target field created under the Things type called “Reference Number” or “Case Number” could be used for Target Groups relating to Insurance Claims, Bankruptcy Cases, Court Hearings, Vacancy, etc.
Each target type has a different set of standard fields which are shown at the top of the page. These are the fields which autologyx considers the basic minimum required to create a Target Group. For the Person type these include Name, Email Address (which is used as the default unique value and therefore cannot be removed) and Mobile. For Things and Relational these are limited to Name and Description. Each type has a further standard field called “Creation Date”. This is auto-populated with the date and time an individual target record is created.
Standard Fields are system generated and cannot be added or amended; they are Available by default. You can untick this box but this will result in that Standard Field being removed from all Target Groups of that Type.
The Custom Fields area is where you will create the target fields you require for your target records and workflow.
Before creating target fields you should familiarise yourself with the types of field available.
Field Types
- Integer: Used to record data which consists only of whole numbers eg Age in years (25), Year of manufacture (1999), Company registration Number (1456872) or Part Number (85147).
- Double: Used to record numbers with decimals points eg Hours Worked (25.5).
- Boolean: Presents a tick box to show whether something is true (value equals 1) or false (value equals 0). Examples: “Acceptance of Terms”, “I dispute the amount shown on the claim form”, “Consent to act as Director”, "Worked for us previously”
- Freeform: This field type is used for alphanumeric values and data which might include special characters. It is totally non-prescriptive and allows the person completing the field to enter free text. Although useful for gathering information freeform fields don’t lend themselves to reporting/MI. Carriage returns can be used in this field type on a Target Record, in Target Field Completion criteria and in Dynamic Forms.
| Target Record | Target Field Completion Criteria |
 |
 |
- Select From: Used to present a list of options from which only one must be chosen eg Gender, Sector and Status fields.
- Multi Select: Similar to Select From but presents a list of options from which more than one selection can be made.
- Email: Used to record email addresses. autologyx will look for email address format eg no spaces, including an @ symbol, dot (.), etc.
- Phone: Used to record telephone numbers in phone format for use with third party systems and for SMS notifications. autologyx will ensure that the number is entered with the preceding country code, without the initial 0 and without spaces.
- Date: Used to record dates. A calendar is presented to the user from which a date can be selected. Alternatively, the date can be typed into the field.
- Time: Used to record time. The field can be formatted to record time in Hours and Minutes or Hours, Minutes and Seconds.
- Date & Time: Used to record date and times together in one field.
- Creation Time: This field type is used as a standard field to record the date/time a target is added to autologyx.
- Patron: This is a field type used as a standard field for Person Target Types but can be used as a custom field for Thing and Relational Target Types to show which system user is the "owner" of a target.
- Document: The field type will allow one Document file to be uploaded into it.
- URL: Used to record a URL. autologyx will look for a URL format e.g. *text*.*text*
- JSON: Used to capture data in JSON format which is extremely useful for example when handling a large data set from a dynamic form.
Adding Custom Fields
When you land on the Edit Target Types page a warning model is shown. This is simply to remind you that although field names and field options can be changed you should do this with caution. Remember that field options may be used in sequence conditions and you may already have numerous targets with a particular field option selected.
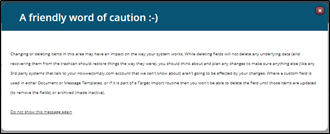
If you do not wish to see this message every time you visit this page click “Do not show this message again” in the bottom left of the modal.
The next thing to remember is that this page always defaults to Person Target Type. Select the Target Type for which you wish to add custom fields.
Ignore the Allow login? checkbox. Authentication is dealt with per Target Group.
Scroll to the bottom of the page.
Name: Enter the name of the required new field
Alias: This field will auto-populate
Type: Select the type of field you wish to create
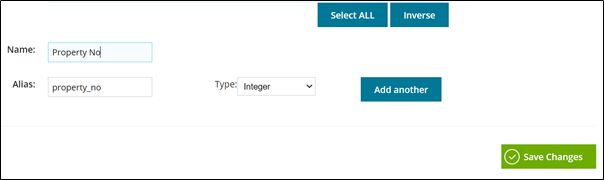
Click Add another

Depending on the field type additional validation fields will be shown. In this case the field type is Integer therefore max and min values are shown so that you can determine the acceptable parameters if required.
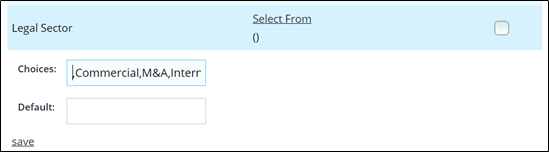
Select from and multi select field types have a “Choices” field which must be populated with all the options for the field. It is good practice to commence the list with a comma (,) so that the field is blank when no option has been chosen. You may prefer to use “Select” or “Blank” as the first option in place of the comma.
Click Save Changes.
When you have finished adding your Custom Fields you need to assign them to the relevant Target Groups.
Assign Custom Fields to Target Group
Go to admin/ Targets/ Target Group List
In the Action Menu for your Target Group select Edit.
Scroll to the bottom of the page and tick the Available column (second from left) to add this field to your Target Group. Click Save.

This field will now appear on Target Records which belong to that Target Group.
Deleting Custom Fields
Custom Fields can be deleted through the right hand column checkbox. However, this should be done with caution. Remember data fields can be used in lots of different places in the system. If you delete a field which is used in a sequence trigger for instance, that trigger will no longer work and your sequence flow will be broken.
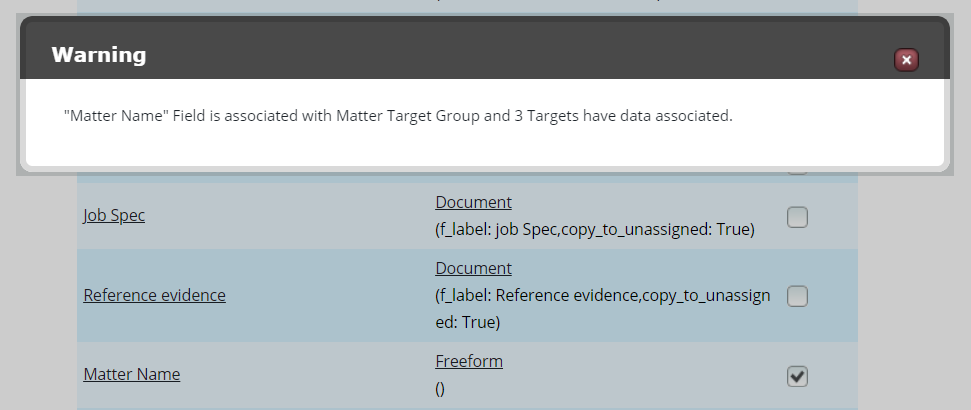
Once a field is selected to be deleted, you will see an onscreen warning if the field has been applied to a Target Group and existing Targets have data associated to the field.
If you go ahead and click Save Changes at the bottom of the page you will see a further warning modal:
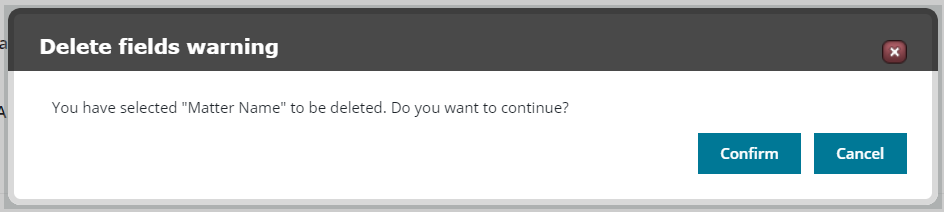
If you click Confirm the field will be deleted.
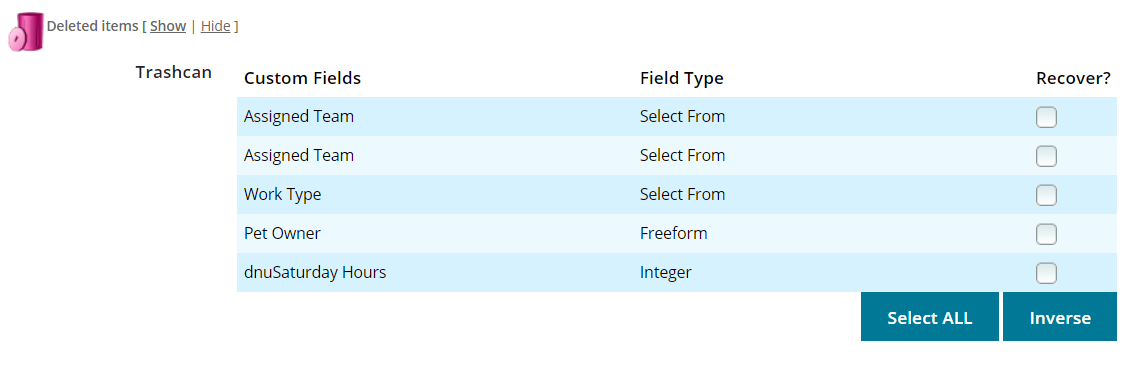
However, the field is retrievable from the bottom of the page.
To re-instate a deleted field click "Show" next to the Deleted Items bin. Tick the Recover box adjacent to the field you wish to re-instate then click Save Changes.
Comments
0 comments
Please sign in to leave a comment.