
The Target List contains a list of every target that is currently in the system. We have already looked at how to use the Target Group filter and search for a Target record using the Identifier fields.
You can also search for Target Records using the 3 search options at the top of the list.
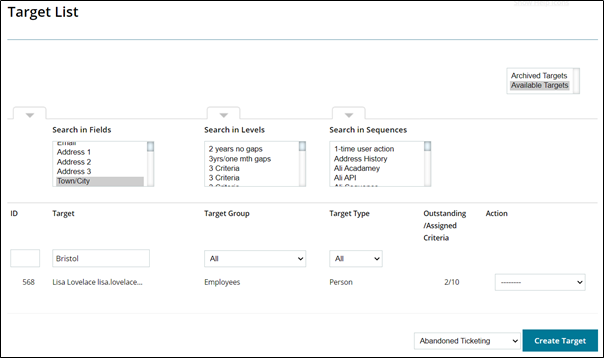
Search in Fields provides a list of all target fields in use across all your Target Groups. This will allow you to find records where you can remember specific data other than names.
Search in Levels allows you to search for Target Records which have specific Levels assigned to them.
Search in Sequences allows you to search for Target Records where specific Sequences have been run against them.
Targets are listed by ID number in ascending order; they can be searched by ID in the search box below the column header “ID”, as shown below.

Person Target Types who have authenticated themselves by creating a password for use on the Target Portal will be listed in black text. Person Target Types who have not logged in will be listed in grey text as will Relational and Things Target Types. Targets of the Person Type who have been set up with 1 time completion accounts will also be listed in black text.
The other column headers are as follows:
Target Type – this is a filter which will allow you to change the list to show only one type of targets: Person, Relational or Things.
Outstanding/Assigned Criteria – this column shows the number of outstanding criteria (ie those which have not been completed) against the total number of criteria assigned to the Target.
Action – this provides a menu per Target and consists of the following options:
Edit – used to add or amend data in an existing Target Record. If any fields on the Target Group have been made mandatory since the Target Record was created they will be marked with a red asterisk and you will not be able to save the record without completing these fields.
Archive/Un-archive – this provides a quick mechanism to archive single targets as required. You will be presented with a screen which allows you to consider this action and confirm if you wish to go ahead.
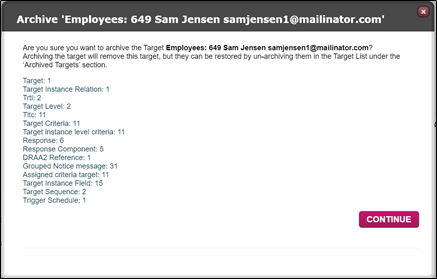
You will see an immediate confirmation but the archive action can take up to a minute or so.

Once completed the Target is moved to the “Archived Targets” List.
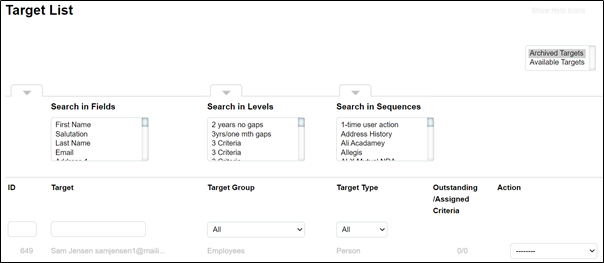
From here the Target’s menu options are limited to Un-archive which will bring the Target back into the main Target List, and Erase which will allow you to permanently delete the Target from the system.
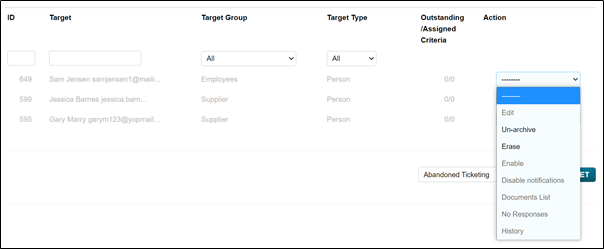
Erase - this provides a quick mechanism to erase single targets as required. You will be presented with a screen which allows you to consider this action and confirm if you wish to go ahead.
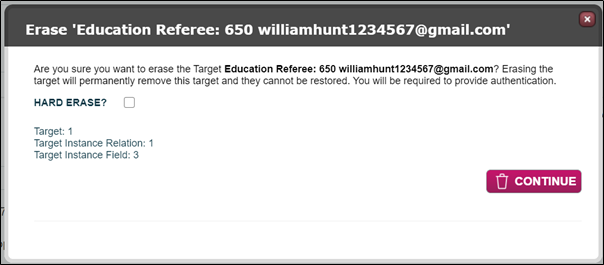
The target will be erased permanently from the system and cannot be restored.
The Hard Erase tick box being checked will mean that if the selected Target is a child within a Relational Target it will also be permanently removed without trace from that Relationship.
A full explanation of the Archive and Erase feature can be supplied if required.
Documents List – this is a quick link to the documents associated with the Target. The Documents List will have 3 tabs as shown below.
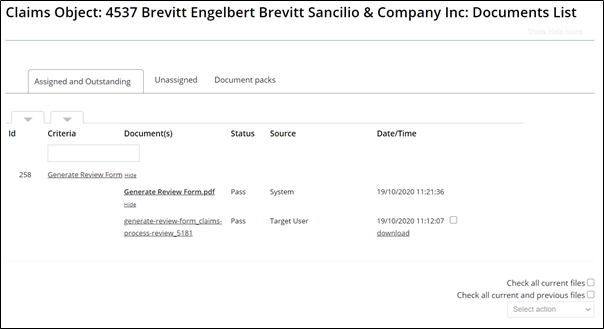
Assigned and Outstanding – these are documents directly related to criteria (tasks).
Unassigned – these are documents which have not been linked to a task. They may have been collected by the Email Collector or may have been uploaded by a System User or uploaded by a Target using the “Send Us Stuff” tab on the Target Portal.
Document Packs – these are collections of documents compiled into document pack generated by the system according to the conditions set up in the Store.
Response List/No Responses – this takes you to a list of criteria responses for tasks which have been completed against this Target. The Criteria Title, the level in which it was assigned, the criteria response type, whether Valid (most recent completed, not expired) and the Action Menu make up the column headers for this list.
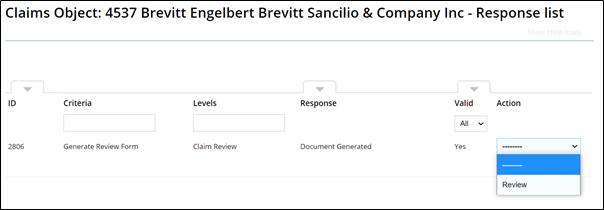
The above list shows that only one criteria has been completed for this Target. The action menu has a Review option which will take you to the Response Review page which gives further information about the response including a link to the document which was generated.
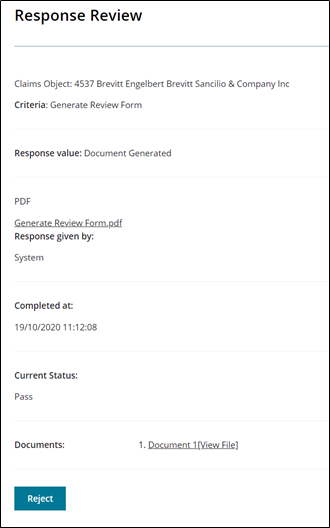
The above example tells us that the response was given by “System”. This is because the criteria response type is “Document Generation v2” which will automatically generate a document when the task is assigned. Please note: criteria responses are usually reviewed from the Dashboard, however this option provides an alternative view of the same data.
If there are no responses for the Target the menu item will be show as No Responses.
Unassign Everything - only shown when criteria have been assigned. This option will allow you to unassign all criteria which have not been completed. Tasks with two parts such as DRAAv2 or Criminal Records Check will not be unassigned if the Target has completed their part even if a System User’s part has not been started.
History – this will take you to the Activity and History listing for the Target. Further information will be provided about this feature in the Dashboard section.
In addition, Person Type Targets have the following options:
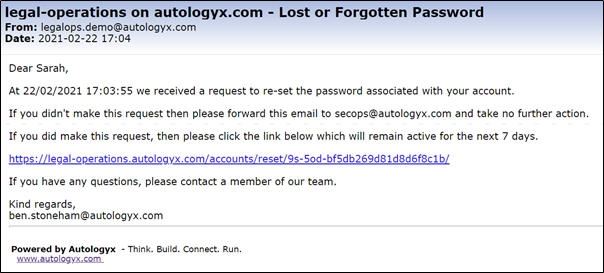
Password Reset – this option will send the Target an email which will allow them to reset their log in password for the Target Portal.
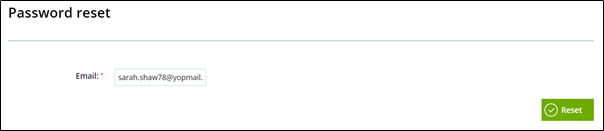

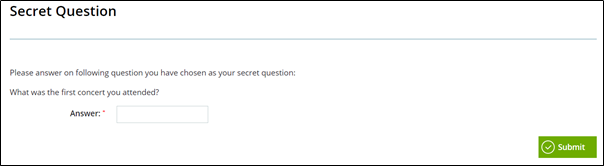
The Target can also do this for themselves on the Login page using the Password reset link. However, this method requires them to answer the Secret Question they selected when creating their account.
Therefore, the link from the Target List should be used with caution. It is advisable to get the Target to confirm some data you hold about them in order to verify their identity.
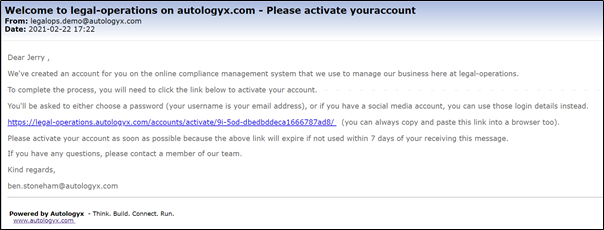
Disable/Enable – if the Target has authenticated themself and logged in to the Target Portal the Disable option can be used to disable their account. They will no longer be able to log in. If the Target has not logged in before the link in their activation email expires, the Enable option will send them a new activation email. The email looks like this and has a unique link to allow them to activate their account.
Disable/Enable Notifications – this option can be used to stop emails from being sent to the Target. If emails have already been disabled the option will be listed as Enable Notifications which will allow them to be turned back on.
Comments
0 comments
Please sign in to leave a comment.